Linkskey LKV-7308 User Manual
Quick installation guide, Introduction, Out-of-the-box installation
Quick Installation Guide
Applicable Models: LKV-7308/LKV-7316 8-Port/16-Port 19” Rackmount USB PS/2 KVM Switch
Rev. 1.1 Aug. 2011 Copyright© All rights reserved.
Active Sync Replication (A.S.R) for all-time full DDC emulation
User-definable Hotkey Preceding Sequence
Factory Default Restore Hotkey
LKV-7308 / LKV-7308-KIT
LKV-7316 / LKV-7316-KIT
8/16-port 19” USB PS/2 Rackmount KVM Switch
Quick Installation Guide
LKV-7308 LKV-7316
LKV-7308 / LKV-7316
Rackmount USB PS/2 KVM Switches
Thank you for purchasing the LKV-7308 / LKV-7316 8-Port/16-Port
Rackmount USB PS/2 KVM Switch!
With our highly reliable and
quality product, user can enjoy countless benefits from using it.
Introduction
The LKV-7308/LKV-7316 Rackmount USB PS/2 KVM switch supports
USB interface and legacy PS/2 interface on both console side and PC
side. You can use either PS/2 or USB keyboard/mouse on the console
side as well as either PS/2 or USB interfaces on the PC side. It is
especially useful when your server room is inhabited with legacy
computers with only PS/2 interfaces and yet with some newer
computers equipped with only USB interfaces.
The rackmount design offers a neat placement of the KVM switch
units on the rack for centralized management and also for security
enhancement that could be provided by a locked server room. You
can simply place it on desktop or mount it on a standard 19” rack for
more secured and centralized management.
To ensure ultimate video compatibility requirements on recent
operating systems, such as Windows 7 and Mac OS X, this KVM
switch features advanced Active Sync Replication (A.S.R)
technology which supports all-time full DDC emulation so that the
video compatibility will be as constant and stable as it should be, no
matter how you switch. This all-time full DDC emulation can get rid of
those problems that are related to the absence of appropriate DDC
data on the KVM switch when port switching is taken place.
Out-of-the-box Installation
Take the KVM Switch out of the box and begin installation.
1. Set up your local console: Connect the shared keyboard, mouse
and VGA monitor to the console connectors on the backpanel of
your KVM switch. (Note: keep KVM switch power off at this step).
2. Power on the console VGA monitor: Plug in the power cable of
monitor and turn on the monitor.
3. Power on the KVM switch: Power on the KVM switch by
plugging in the provided power adapter to the power jack on the
backpanel.
4. Connect servers/ computers to the KVM switch:
i.
Make sure computers that are to be connected to the KVM
switch are powered off.
ii. Use our special 3-in-1 KVM combo cable (see below image)
to connect each of your computers to the PC ports at the
backpanel of the KVM switch. When connecting with a PS/2
computer, just add an USB-to-PS/2 adapter to the USB
connector and you’ll have a PS/2 connector for mouse. When
connecting with a USB computer, just plug the USB connector
to computer and leave the PS/2 connector free. Do not
connect both USB connector without adapter and PS/2
connector to a computer at the same time.
C-KVM-SC6/10/15
C-KVM-SC6/10/15
Special integrated USB & PS/2 KVM combo cable
iii. Select the desire port first then power on the connected
computer.
5. Repeat step 4 and 5 for the remaining computers.
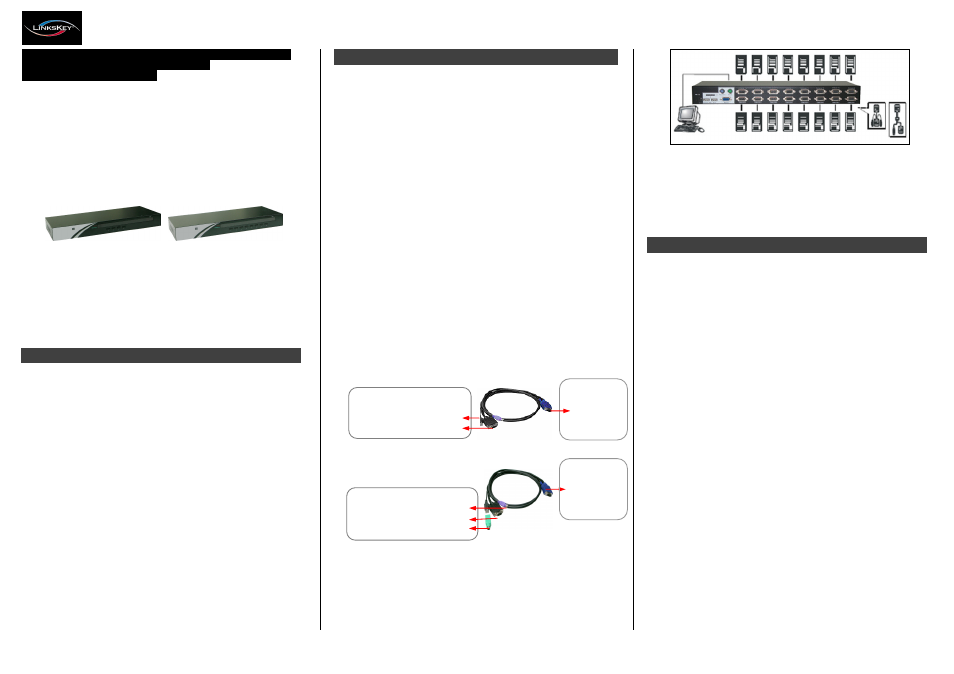
Connection Diagram
After your computer is powered up, the keyboard and mouse will be
recognized and now you can begin operating the switch.
Note: If you experience mouse lock on any of your computer, you can
use the mouse reset hotkey sequence to regain the mouse control
(see the Quick Reference Sheet).
Operation
There are two methods to select a specific computer, using a front-
panel push button or a hotkey sequence.
Front-Panel Push Buttons
The front-panel buttons let you have direct control over KVM switch
operation and port switching. Simply press a button to switch to its
corresponding port. See the Quick Reference Sheet.
Keyboard Hotkeys
A keyboard hotkey sequence consists of at least three specific
keystrokes: (See the Quick Reference Sheet)
Hotkey sequence = [ScrLk]
*
+ [ScrLk]
*
+ Command key(s)
* User-definable = SCROLL LOCK, CAPS, F12 or NUM LOCK
Hotkey preceding sequence configuration: For users who want to
use a preceding sequence other than two consecutive Scroll Locks,
there is also one convenient way to configure it. (1)Hit ScrollLock +
ScrollLock + H, then two beeps will signal readiness for new
preceding sequence selection [or Press and hold down the last front-
panel button (Button 8 or 16) until you hear two beeps, release the
button.] (2) Select and press the key you would like to use as your
preceding sequence (SCROLL LOCK, CAPS, F12 or NUM LOCK
keys are available for selection) and you’ll hear a beep for selection
confirmation. Now you can use the new preceding sequence to
execute your hotkey commands.
Note: The two consecutive ScrLk (scroll lock) keystrokes should be
pressed within 2 seconds and the following command key(s) should
also be pressed within 2 seconds in likewise manner. Otherwise, the
hotkey sequence will not be validated.
For detailed Hotkey sequences and their corresponding functional
commands. See the Quick Reference Sheet.
Using USB connection:
Connect USB and VGA
connectors to computer.
Connect to
PC port at
the backpanel
of the KVM
switch
Using PS/2 connection:
Connect PS/2 keyboard, VGA,
and USB with USB-to-PS/2
adapter to computer.
Connect to
PC port at
the backpanel
of the KVM
switch