Genee World GV-2100 User Manual
Page 15
TEXT: Press the “TEXT” button once to switch to the text mode to
sharpen the edge of the text. Press the “TEXT” button again to return to
the image mode
TITLE: Press the “TITLE” button once to freeze top 1/8 of the screen.
Press the “TITLE” button again to exit
AUTO: Press the “AUTO” button to automatically adjust the white
balance and focus
TELE/WIDE: Press the “TELE” button to zoom in and press the “WIDE”
button to zoom out
FAR/NEAR: Press the “FAR” button to focus far and press the “NEAR”
button to focus near
CDD: Press the “CDD” button to display the camera (visualiser) signal
RGB: Press “RGB” button to display the computer signal
BRIGHT +/-: Press the “+” button to increase the brightness. Press the
“-” to decrease the brightness
RED +/-: Press the “+” button to increase the red hue. Press the “-” to
decrease the red hue
BLUE +/-: Press the “+” button to increase the blue hue. Press the “-”
to decrease the blue hue
B. Snap Video Stream
Click “Capture” - “Start Capture”, input the file name in dialogue
box, or click icon on the toolbar, then input the file name in dia-
logue box. If you want to set the time limit for the capture, select
“Capture” - “set Time Limit” to set the time limit. Click “Start
Capture” to start capture, and click “Stop Capture” or icon on
the toolbar to stop capture. (If you have set the time limit, it will
stop automatically when the time is set up.) The video file is AVI
format.
C. Set the Frame Rate
Click [Capture] - [Set Frame Rate], and then click open “Choose
Frame Rate” to set the frame rate.
D. Set Time Limit
Click [Capture] - [Set Time Limit] to set the time limit while
capturing video.
E. Note
Do Not connect/disconnect the USB cable when the application is
running, which will cause the program to be interrupted.
Other applications
Displaying standard slides and negatives
Insert a standard slide or negative to the slot on the mirror, flip the
mirror to the position that the slide or negative faces the camera
head, then turn on the back light to display the slide or negative.
LAMP: Each time you press
button, the lighting changes as
below:
FREEZE: Press the “FREEZE” button once to freeze the image. Press
the “FREEZE” button again to exit the freeze mode
XGA: Press the “XGA” button once to display images from SVGA
(800x600) mode. Press the “XGA” button again to display images at
the XGA (1024x786) mode
B&W: Press the “B&W” button once to display images at the black
and white mode. Press the “B&W” button again to display images at
the colour mode
SPLIT: Press the “SPLIT” button and the image will be split into two
images. One is the live image and the other is a frozen image. Press
the “SPLIT” button again to exit
D./S: Press the “D./S” button once to display still images with
better clarity. Press “D./S” button again to display moving objects at
real time (30 frame/second)
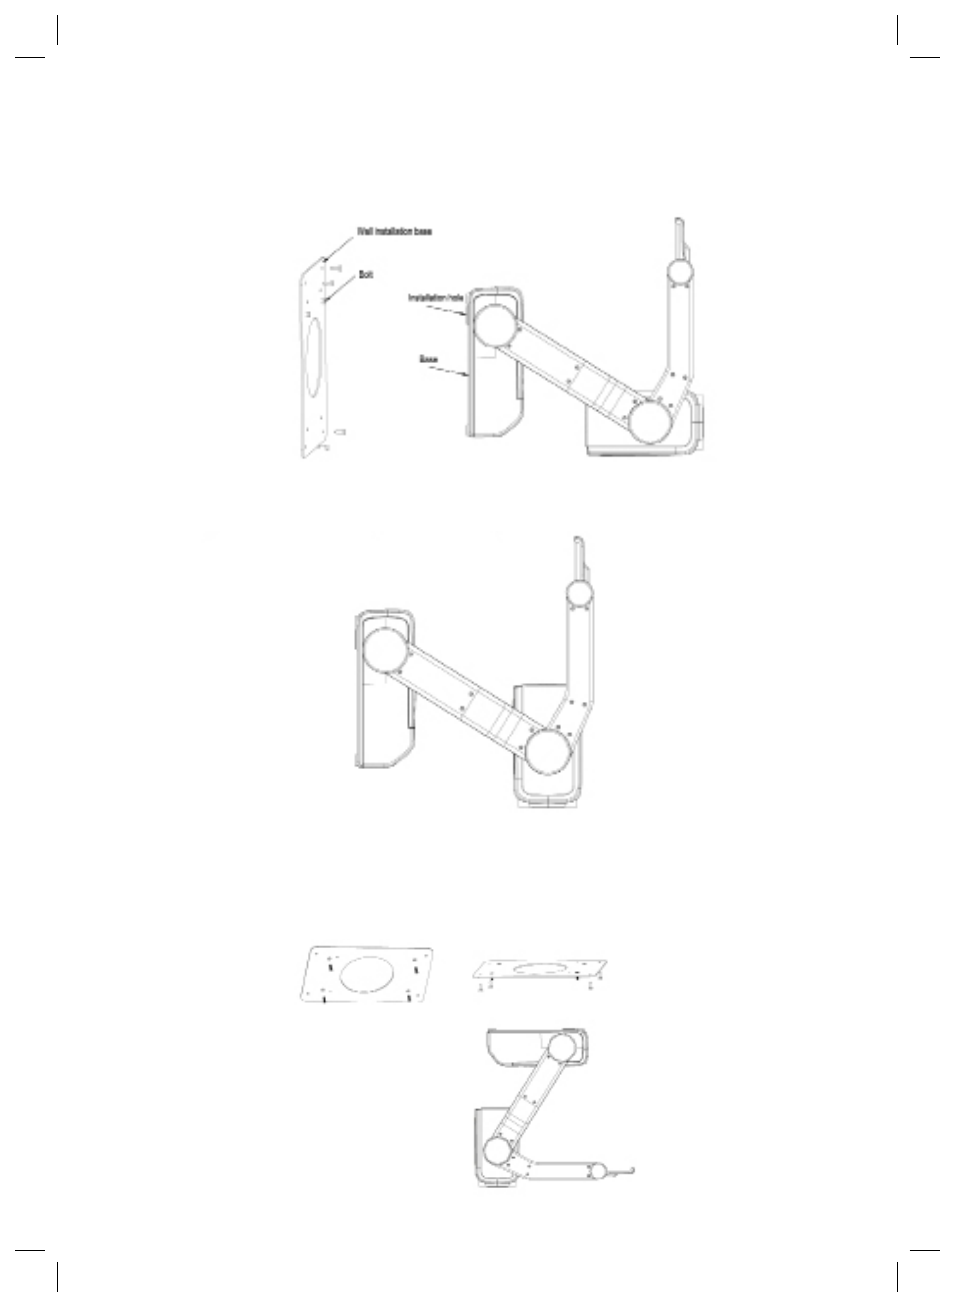
Wall mounting applications
Install visualiser on the wall and position the camera head parallel to
the base. (Need take close-up lens off first)
Install visualiser on the wall and position the camera head vertically to
the base. (Need to take close-up lens off first)
Ceiling mounting applications
Attach the wall installation base to the base of the visualiser, screw
down the four screws to fix the base and then mount the visualiser to
the ceiling.