5 – mixer panel settings, Mixer page – Teac UH-7000 User Manual
Page 17
TASCAM UH-7000
17
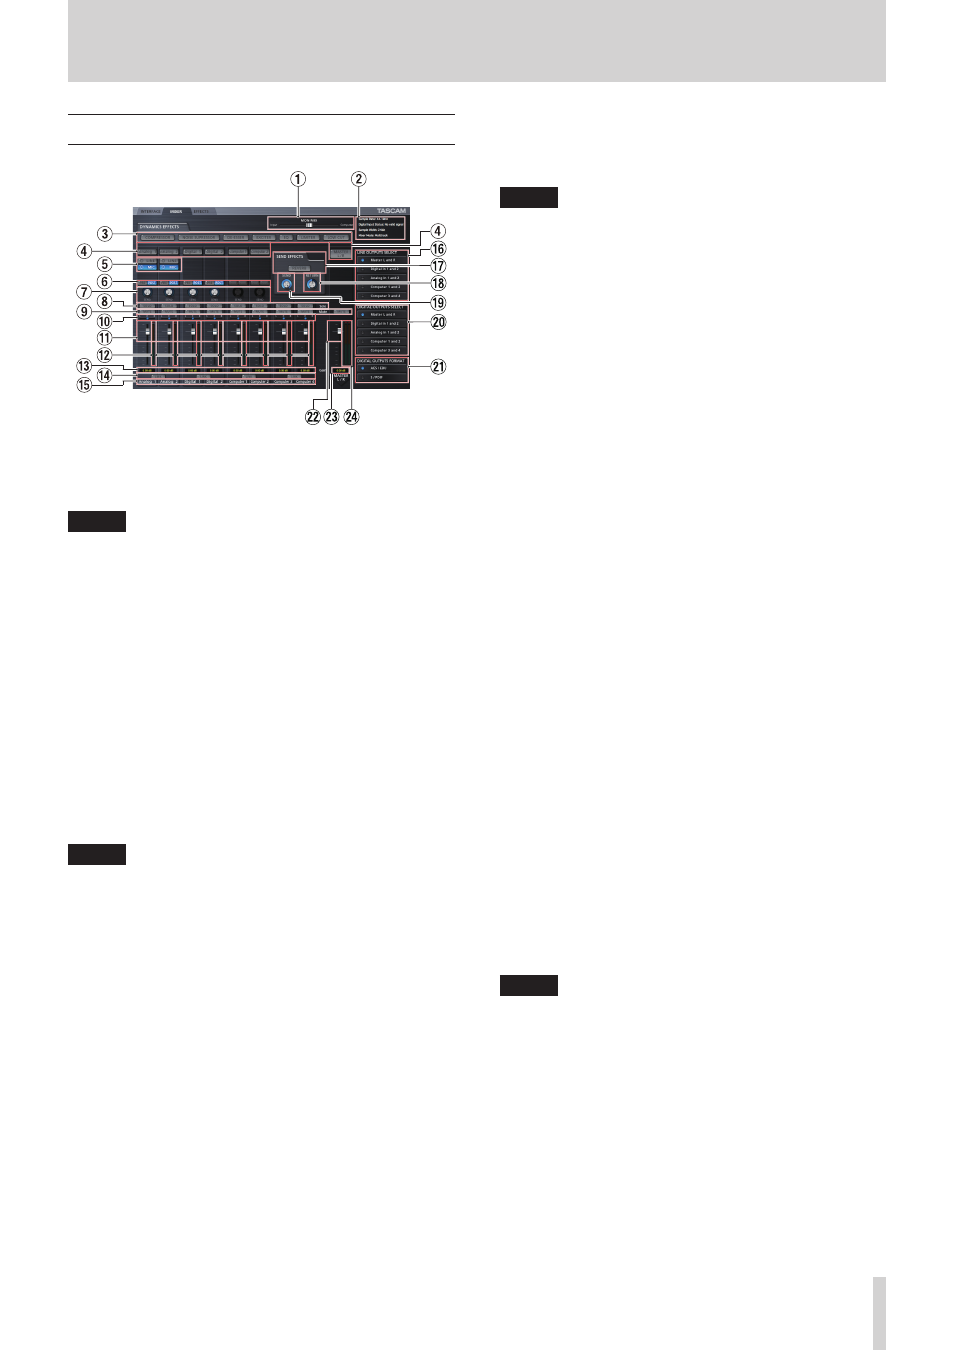
5 – Mixer Panel Settings
MIXER page
Use the MIXER page to make settings for the built-in mixer and
output signals.
The contents of this screen depend on the Mixer Mode setting
on the INTERFACE page.
NOTE
All settings except for the status of the SOLO buttons made
on the MIXER page are retained even when the unit is turned
off. The solo buttons are reset to their default values (off)
whenever the unit is turned off.
1
MON MIX slider
If the Mixer Mode setting on the INTERFACE page is set to
Multitrack, you can use the slider to adjust the balance of
the signal output from the built-in mixer.
Slide it all the way to the Input side to output only the
signals input to this unit, or slide it all the way to the
Computer side to output only the signals output from the
computer to the unit by USB.
Click the slider and drag it left and right to adjust it.
If the Mixer Mode setting on the INTERFACE page is set to
Stereo Mix, the MON MIX slider will not appear. The signals
input through each input jack and from the computer
output will be mixed and output from the unit.
NOTE
If the Mixer Mode setting is set to Multitrack, you can return
the MON MIX slider to the center position by clicking it while
pressing the following key on the computer keyboard.
Windows PC: ctrl key
Mac: command key
2
Status display area
This shows the current status of the unit.
Sample Rate:
Current sampling frequency
Sample Width:
Quantization bit depth
Digital Input Status: Shows the digital input status
Mixer Mode: Shows the mixer mode
3
Dynamics effects buttons
Click a dynamics effect button to select and use it.
No more than two types of dynamics effects can be used at
a time. (The one exception is the combination of the limiter
and low-cut filter effects.)
Options
Off (default): Effect name unlit
On: Effect name lit
To change the dynamics effect being used, click the
button of the desired effect. The previously used effect will
automatically be turned off, and the newly selected effect
will be turned on.
NOTE
• Selection will not be possible when an effect cannot be used
because of sampling frequency conditions.
• Turning the dynamics effect on/off using these buttons is
linked to the dynamics effect on/off setting on the EFFECT
page.
• When the sampling frequency is 44.1 kHz or 48 kHz, both
the limiter and low-cut filter functions can be used together
at the same time. When using these two effects at the
same time, the send effect cannot be used. (See “Dynamics
4
Dynamics effects assignment buttons
Click the buttons for each channel and the MASTER L/R
button to assign the dynamics effect to it.
You cannot assign the dynamics effect to more than one
channel at a time.
Options
Off (default): Channel name button unlit
On: Assigned channel name button lit
To change the channel to which the dynamics effect is
assigned, click the channel name button of the desired
channel. The previously assigned channel name button will
become unlit, and the newly assigned channel name button
will light.
5
Analog input switches
Select the analog inputs for the Analog 1 and Analog 2
channels.
The button for the selected input lights.
LINE button: Input from the ANALOG (BALANCED) LINE IN
1/2 jacks.
MIC button: Input from the ANALOG (BALANCED) MIC IN
1/2 jacks.
6
Effects send selection buttons
Set whether the signal sent to the send bus is pre-fader or
post-fader.
The selected button lights.
Pre button: The signal is sent to the send bus before
adjustment by the channel fader. The send level will not
be affected by the channel fader.
Post button: The signal is sent to the send bus after
adjustment by the channel fader. The send level will be
affected by the channel fader.
NOTE
If neither the pre button nor the post button is selected, no
signal will be sent to the send bus.
7
Send knob
Use to adjust the level of the signal sent to the send bus
(send level).
Range: 0–127 (default: 0)
Use the mouse to click and drag a SEND knob up or down to
adjust the level.
While dragging the mouse, the value being adjusted is
shown beneath its SEND knob.
- LX
- WR-DA7
- SL-D930 Appendum
- DS-H01
- HA-P50
- UD-301
- SL-D930
- UD-501 Setup instructions for Mac
- UD-501 high-res
- UD-501
- T-R680RS
- CD-01U PRO Quick Start
- MC-DX32I
- BP-6AA
- CD-BT2
- CD-D11U
- CD-D13
- CD-D13
- TN-300
- CD-RW901SL
- CD-RW901SL
- CD-RW901SL
- CD-VT2
- DM-24 Quick Start
- DM-24 Effects Manual
- DM-24 Basics Manual
- DM-24 Logic Environment Instructions for PC
- DM-24 New features
- DM-4800 Software Guide
- DM-24 Addendum
- DM-4800 Effect List
- DP-24 Appendum
- DM-24
- DR-05 Reference Manual
- DR-05 Reference Manual
- DR-05 Reference Manual
- DR-1
- DP-24SD
- DP-24SD
- DR-100MKII
- DR-40 Appendum
- DR-2DW
- DR-40
- DR-40
- DR-680 Appendum V.1.30
- DR-680 Appendum V.1.20
- DR-680
- DR-40
- DS-M7.1 Applications Guide
- DS-M7.1 Setup Guide
- FE-8
- FW-1082 Setup Guide
- FireOne
- FW-1082 Applications Guide
- FW-1884 Quick Start
- FW-1884 Emulation
- FW-1884 Mackie Control Emulation
- FW-1884 Applications Guide
- FW-1884 Setup Guide
- GT-R1 Addendum
- HD-P2 Quick Start
- FW-1884
- HD-R1 V.1.10
- HD-R1 Addendum
- HS-2 Addendum
- HS-8 Firmware v1.20
- HS-8 Firmware V1.30
- HS-8 Firmware V1.40
- GT-R1
- HS-8 Software Manual
- HS-P82 Addendum V1.04
- HS-P82 Addendum V1.04
- HS-P82 Addendum V1.04
- HS-P82 Quick Start Guide
- IF-SM/DM
- IM2
- LA-40MKIII
- LA-81MKII
- HS-P82
- ViewNet Audio
- MMR-16 v5.01
- MD-CD1MKIII
- MMR-16 v1.25
- HS-2
- MMR-16 v2.0
- MMR-16 v3.1
- MMR-16 v3.2
- MMR-16 v4.3
- MMR-16 v4.6
- MX-View Version 1.0b1
- MMR-16 v4.7
- MMR-16 v3.0
- MMR-16 v4.5
- MMR-16 Pro Tools
- MMR-16 v1.00
- MMR-16 v1.00
- MMR-16 v1.00
- MP-GT1 Quick Start
- RC-2424 v1.04
- RC-2424 v1.04
- MX-2424 Installation v1.01
- MX-2424 Quick Reference Guide
- MX-2424 v2.0
- MX-2424 Installation v1.00
- MX-2424 Digidesign Pro Tools
- MX-2424 Tutorial
- PT-7
- MX-2424 v1.15
- RC-HS20PD v.B
- RC-HS20PD v.A
- SX-1 Quick Start Guide
- SS-R05
- SS-CDR1
- SX-1:SX-1LE Documentation Sony P2 Protocol
- T-3000
- SS-R200
- PCM Recorder
- US-100
- US-122 CD Installation
- TU-690
- TU-690
- US-122 Quick Start
- US-122
- Cubase LE 5
- US-125M
- US-125M Quick Start
- US-144
- US-144
- US-1641
- US-2000
- US-224 Optimization Tips for Mac
- US-428 Windows Drivers
- US-428 Windows Drivers
- US-2400 Quick Start
- US-2400
- US-2400 Applications Guide
- US-224
- US-428 with Steinberg’s Nuendo
- X-48 Quick Start
- US-428
- US-800
- X-48MKII
- SX-1 Reference Manual
- 202MKVI
- 202MKVI
- CG-2000
- CG-2000
- DA-3000
- IF-FW/DM
- IF-FW/DM Applications Guide
- DR-70D Reference Manual
- DR-680MKII
- DR-70D
- DR-60D
- DR-60D
- DR-60DMKII
- DR-05 V.2.00
- DR-22WL Reference Manual
- DR Control
- DR File Transfer
- DR-10X
- DR-10C
- DR-22WL
- DR-44WL Reference Manual
- DR-V1HD
- DR-44WL
- HS-4000 Addendum V1.21
- HS-4000 Addendum V1.21
- IXZ
- Portastudio
- HS-20
- US-16X08 Reference Manual
- HS-2000
- HS-4000
- Live 9 Lite
- US-4X4 Reference Manual
- SONAR LE
- TM-2X
- US-16X08
- DP-006
- DP-03 Addendum
- US-4X4
- DP-008EX
- DP-03SD
- DP-03SD
- DP-32SD
- DP-32SD
- US-1200 Quick Start
- US-1200
- US-200
- US-322
- US-366
- US-600
- Hi-Res Editor Installation
- Hi-Res Editor
- CD-GT2
- TC-8
- 2488 Quick Start
- 788 EPROM Update Files v1.10 Installation
- 788 Addendum
- 2488 Reference Manual
- CD-BT1
- CD-RW750
- DP-01 Series Quick Start
- CD-GT1
- 2488
- FW-1804
- FW-1804 Applications Guide
- GigaStudio
- DV-W14R
- DP-01 Series Owners Manual
- GVI
- PocketStudio 5 Getting Started
- PocketStudio 5 Reference Manual
- VL-S21
- GigaPulse
- GigaStudio 3
- GigaStudio 4
- GRANDIOSO P1
- P-02
- GRANDIOSO D1
- D-02
- D-07x
- G-01
- G-02