Remote control, General functions – DynaScan 46″ Video Wall Super Narrow Bezel LCD DS46LX2 User Manual
Page 16
7
2.3. Remote Control
2.3.1. General functions
POWER
SMART
VIDEO
SOURCE
PIP
INPUT
ON/OFF
CHANGE
BRIGHTNESS
CONTRAST
DISPLAY
AUTO
ADJUST
MUTE
VOL UP
VOL DOWN
EXIT
MENU
SET
AUDIO
SOURCE
1
10
11
12
13
14
15
16
17
18
19
20
2
3
4
5
6
7
8
9
1
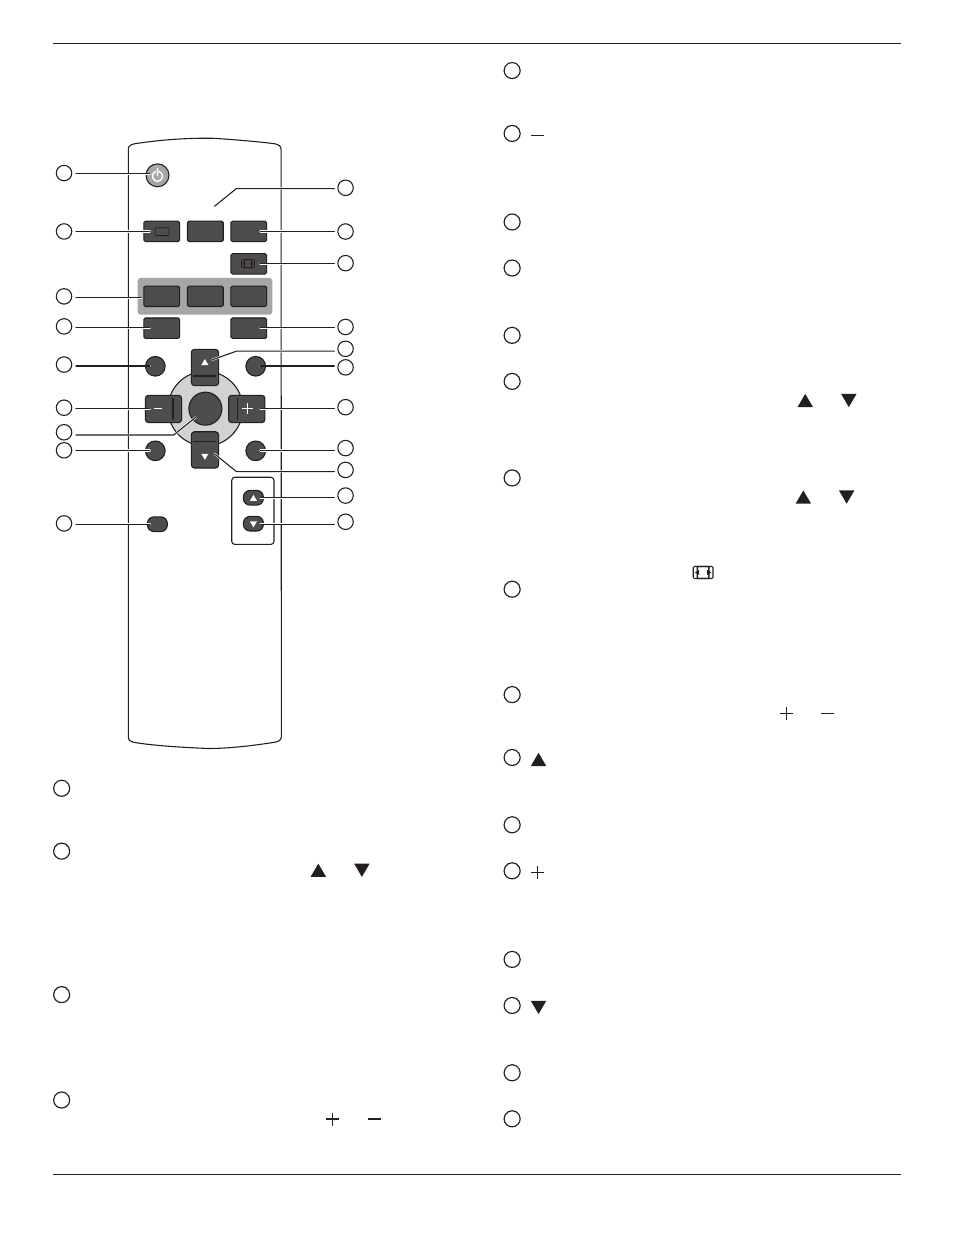
[POWER] button
Press to switch on the display from standby mode. Press
again to turn it off and back into standby mode.
2
[SMART] button
Press to activate Smart Menu. Press [ ] or [ ] button to
select menu options. Press [
SET] button to confirm and exit
the selection.
• Standard: Used for normal images (factory setting)
• Highbright: Used for moving image such as Video
• sRGB: Used for text based images
3
[PIP] (Picture In Picture) button
[
ON/OFF]: Turn PIP mode ON/OFF.
[
INPUT]: Select the input signal for the sub-picture.
[
CHANGE]: Toggle between the main picture and sub
picture.
4
[CONTRAST] button
Press to activate Contrast Menu. Press [ ] or [ ] button to
adjust the value. Press [
MENU] button to confirm and exit.
5
[DISPLAY] button
Press to turn on/off the information OSD displayed on the
upper right corner of the screen.
6
[ ] button
• Press to move the selection left in OSD menu.
• Press to decrease the value in OSD menu.
• Press to move the sub-picture left in PIP mode.
7
[SET] button
Press to activate the setting inside the OSD menu.
8
[AUTO ADJUST] button
Press to run the Auto Adjust function.
NOTE: This button is functional for
VGA input only.
9
[MUTE] button
Press to turn the mute function on/off.
10
[VIDEO SOURCE] button
Press to toggle Video Source Menu. Press [ ] or [
] button to select one of the video sources among
HDMI,
DVI-D, VGA, DVD / HD, VIDEO-S, or VIDEO . Press [SET]
button to confirm and exit.
11
[AUDIO SOURCE] button
Press to toggle Audio Source Menu. Press [ ] or [ ] button
to select one of the audio sources among
HDMI, AUDIO1,
AUDIO2, or AUDIO3. Press [SET] button to confirm and
exit.
12
Picture Format button
Press to switch screen aspect ratio.
• For PC signal:
FULL, NORMAL, CUSTOM and REAL.
• For Video signal:
FULL, NORMAL, DYNAMIC, CUSTOM
and
REAL.
13
[BRIGHTNESS] button
Press to toggle Brightness Menu. Press [ ] or [ ] button to
adjust the value. Press [
MENU] button to confirm and exit.
14
[ ] button
• Press to move the selection up in OSD menu.
• Press to move the sub-picture up in PIP mode.
15
[MENU] button
Press to turn the OSD menu on/off.
16
[ ] button
• Press to move the selection right in OSD menu.
• Press to increase the value in OSD menu.
• Press to move the sub-picture right in PIP mode.
17
[EXIT] button
Press to turn back to the previous OSD menu.
18
[ ] button
• Press to move the selection down in OSD menu.
• Press to move the sub-picture down in PIP mode.
19
[VOL UP] button
Press to increase the audio output level.
20
[VOL DOWN] button
Press to decrease the audio output level.
DS32CR \DS42CR \DS46CR \DS46LX Series