Digital Alert Systems MultiPlayer User Manual
Page 10
Digital Alert Systems
MultiPlayer Quick Start Guide
Revision 4.0
Page 10 of 13
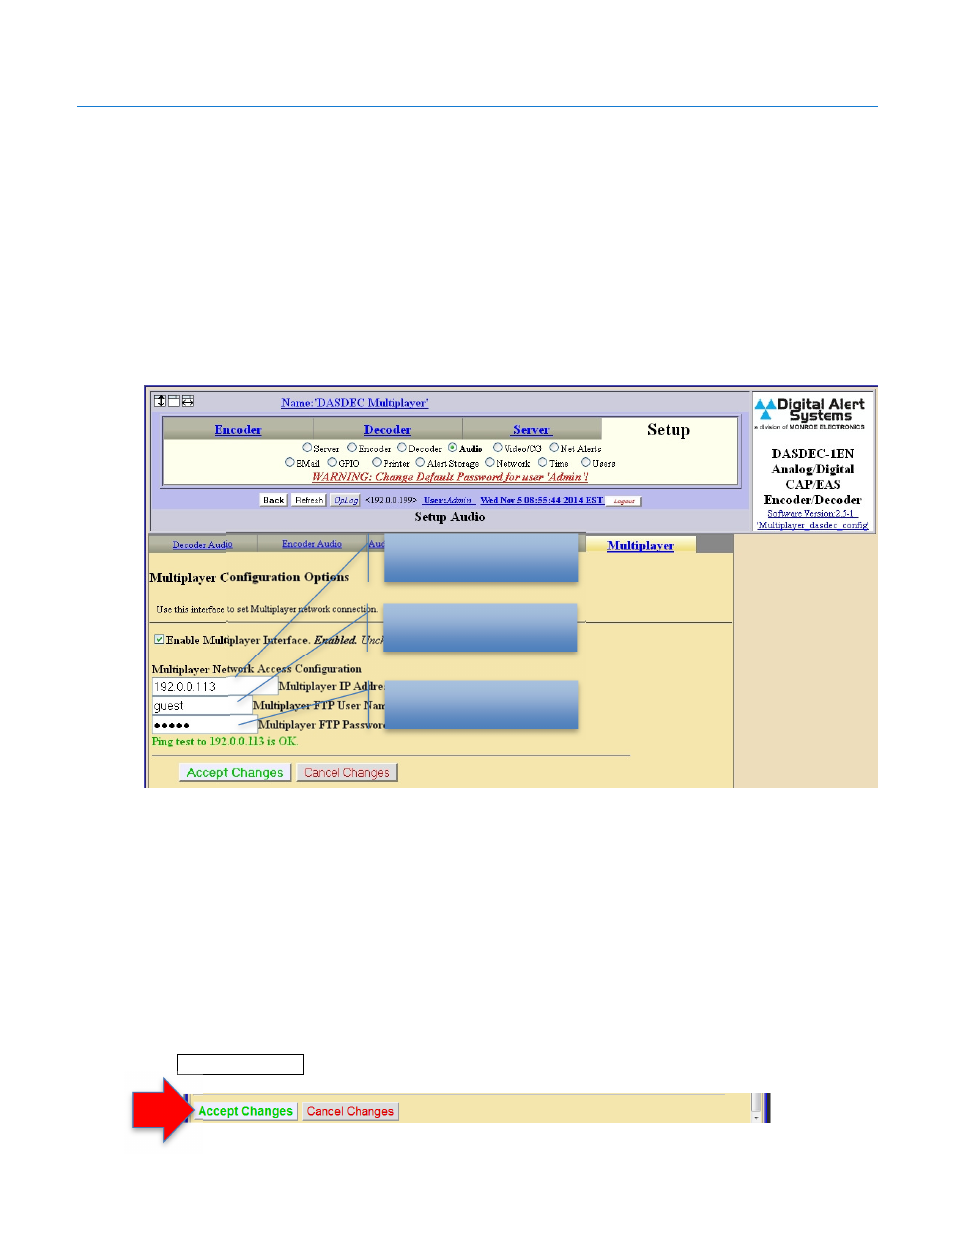
Step 2 – Enabling MultiPlayer Support on the DASDEC
1. Log in to the DASDEC
2. Go to Setup > Audio > MultiPlayer (the MultiPlayer tab only appears in the latest version of
DASDEC software featuring MultiPlayer support, with the Multistation License Key enabled)
3. Enable the MultiPlayer by checking the box Enable MultiPlayer Interface. The screen will
expand to allow additional entries.
4. Enter the MultiPlayer’s IP address in the MultiPlayer IP Address field. (If using the Direct
Multiplayer to DASDEC Connection, enter the Multiplayer’s default IP of 192.168.0.220)
5. Enter the word “guest” (all lowercase, no spaces and no quotations) in BOTH the MultiPlayer
FTP User Name and MultiPlayer FTP Password fields
6. Once the network information is entered, the DASDEC will attempt to verify connection to the
MultiPlayer.
If there is a connection issue the message
Ping test to xxx.xxx.xxx.xxx Failed!
(where
xxx.xxx.xxx.xxx is the IP address entered in the MultiPlayer IP Address field above) will appear.
If the test fails, verify the MultiPlayer’s IP Address is entered correctly, recheck all cables are
properly connected, and verify the network settings for the connection to the MultiPlayer are
correct. If the MultiPlayer is on a network switch/router you can access it from any web-browser
by typing its IP address in to the address field and seeing if the MultiPlayer Home page is
reachable.
7. Click
Accept Changes
Enter the MultiPlayer’s
IP address
Enter the word guest
Enter the word guest
Figure 10 MultiPlayer configuration screen