Imaging with your smartphone – Celestron Inspire 100AZ 100mm f/6.6 Alt-Az Refractor Telescope User Manual
Page 6
6
| ENGLISH
Now that you have observed with your telescope, the next step
is taking a picture of what you are seeing. The Inspire telescopes
have a smartphone adapter built right into the lens cap. To use
this feature:
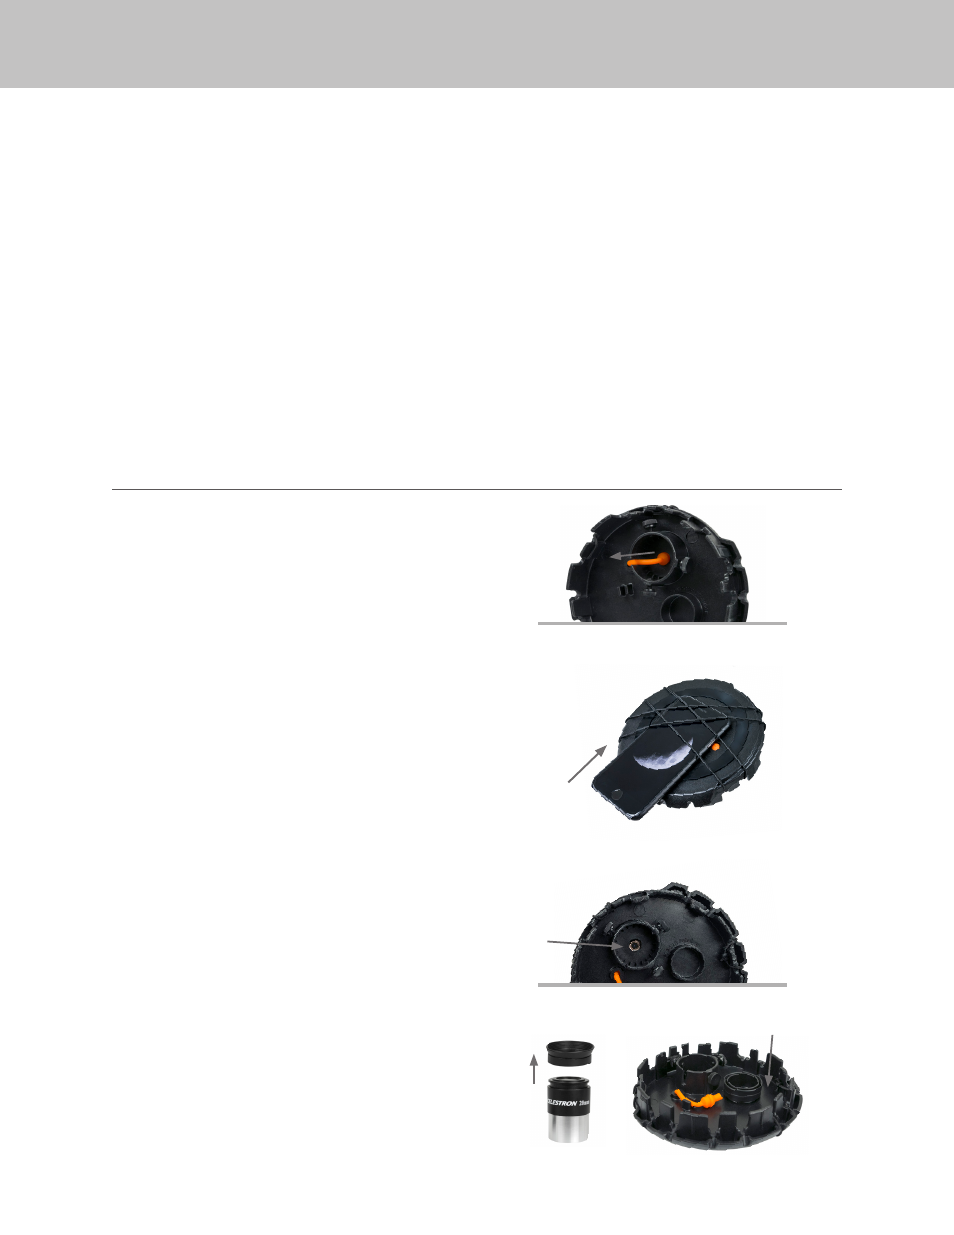
1. Start by pulling the orange plug out of the camera opening in
the lens cap. You can do this by pulling on the orange rubber
lanyard located on the inside of the lens cap. The plug should
pop right out. The plug and lanyard can be stowed out of the
way by pressing the lanyard into the retaining clip located on
the back of the lens cap next to the eyepiece holder.
2. Turn the cap so that the outside of the cap is facing upward.
Lift the bungee straps and slide your smartphone between the
straps and the lens cap so that the camera is looking through
the camera opening. The straps should give plenty of tension
to hold the device against the cap and the black silicon ring will
give enough friction to prevent the phone from sliding around.
HINT:
Depending on the design of your smartphone, the camera may be in the middle of
the device or in one corner. You may want to change the angle of the bungee straps
to better secure the phone. There are eight different anchor points to choose from
around the edge of the lens cap. Simply reposition them to different anchor points to
achieve the best results.
3. Turn the cap over and make sure your camera lens is centered
in the opening in the lens cap. The better you have this centered,
the easier it will be to take images through the telescope.
4. Take the 20 mm eyepiece and remove the rubber eyecup by
pulling it straight off the eyepiece body. There is an eyecup
retainer built-in to the inside of the lens cap so you don’t lose it.
Just stretch the eyecup around the round retainer and slide the
eyecup all the way to the bottom.
IMAGING WITH YOUR SMARTPHONE
1. With a clear view of the Moon, set up your telescope with the 20 mm eyepiece.
2. Turn on the finderscope and look through it to find the red reticle.
3. Move the telescope until you can see the Moon through the finderscope’s window and the reticle is centered on the Moon.
4. Look through the 20 mm eyepiece. Gently turn the focus knob to adjust the sharpness of the image.
CONGRATULATIONS! YOU HAVE NOW OBSERVED YOUR FIRST CELESTIAL OBJECT!
To get a closer view of the Moon, replace the 20 mm eyepiece with the 10 mm eyepiece. It will give you more magnification, making the
Moon appear much larger. You may need to adjust the focus knobs when you change eyepieces to ensure you are getting the sharpest image.
You can view many other celestial objects, such as planets, star clusters and nebulae using this same basic technique.