LEICA SBP PRO 1 Lithium-Ion Battery for S Typ 007 (7.3V, 2300mAh) User Manual
Page 27
EN
23
Basic pictur
e se
ttings
Setting the function
Automatic and fixed settings
1. In the menu, under
IMAGE
, select the item
White Balance
and
2. select the desired function in the sub-menu
Direct color temperature setting
You can directly set values between 2000 and 13100 (K
1
) (from 2000 to
5000K in increments of 100, from 5000 to 8000K in increments of 200
and from 8000 to 13,100K in increments of 300). This provides you with
a broad scope, covering most of the color temperatures occurring in prac-
tice and within which you can adapt the color reproduction to the prevail-
ing light color and/or your personal preferences.
1. In the menu, under
IMAGE
, select the item
White Balance
,
2. in the sub-menu select the variant
Color Temperature
, and
• A further sub-menu appears with a list in which the value to be set
is indicated by the red border.
3. select the desired value there.
Manual setting by metering
1. In the menu, under
IMAGE
, select the item
White Balance
and
2. select the desired greycard variant in the sub-menu
The further procedure differs, depending on the greycard variant.
If you have selected the normal photo mode :
• The message
Please take a picture for setting the white balance
appears in the monitor.
3. Take the picture, making sure that the image field contains a white or
neutral gray (reference) surface.
• The monitor shows
– the image based on the automatic white balance setting,
– cross hairs in the center of the image.
– the button functions and valid in this situation
4. Press the Joystick in the desired direction to move the cross hairs to
the subject detail you want to use as the basis for the new white
balance setting (e.g. the reference surface mentioned above)
5. Press the button alongside the display, or press the Joystick
forward.
• The color reproduction of the picture is adapted accordingly and
the button function valid in this situation is also displayed.
6. You can now either
– either accept this new white balance setting – by pressing the
button alongside the display,
• The message
White balance is set
appears in the monitor.
– or make any number of further settings, as described under 3. - 6.
• The message described under 3. appears each time in the
monitor.
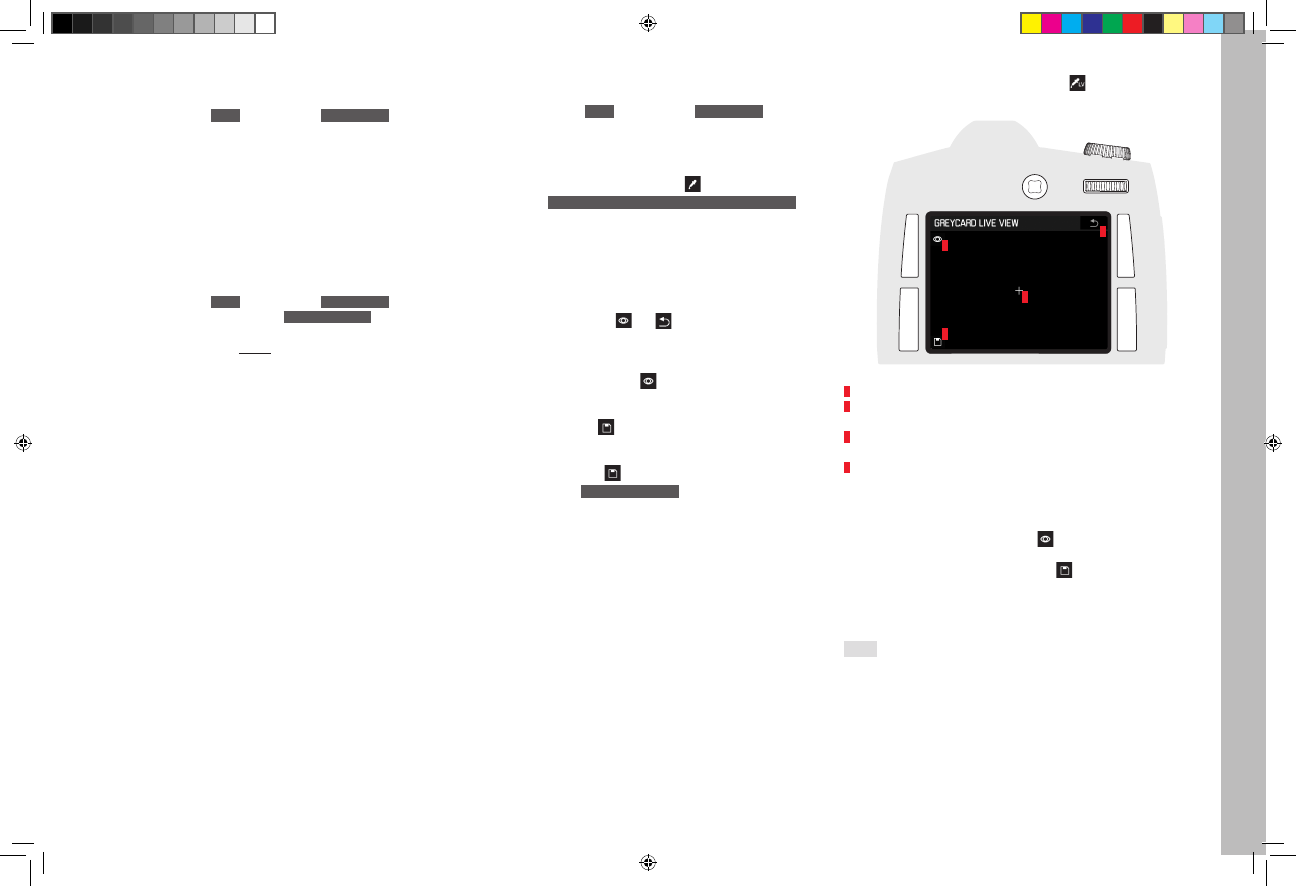
If you have selected the Live View photo mode :
• The corresponding screen appears in the monitor.
1
2
3
4
1
Indication of button function: Perform white balance metering
2
Indication of button function: Save white balance metering (active
only after metering)
3
Indication of button function: Back to normal photo mode (without
saving any metered value)
4
Display of the metering field
3. Move the metering field to a white or neutral gray subject detail by
pressing the Joystick in the desired direction
4. Carry out metering by pressing the button at top left next to the
monitor, or by pressing the Joystick forward
5. Save the metered value by pressing the button at bottom left next
to the monitor
• The camera switches back to the normal photo mode and the
monitor image disappears.
Notes:
• The corresponding picture is always saved parallel to a saved white
balance setting.
• A value set in this way remains saved for and will be used for all pic-
tures until it is superseded by a new metered value or you use one of
the other white balance settings.
Inhalt_EN.indd 23
12.10.2015 09:34:15