Draw curves with pen tool – Adobe Premiere Pro CS6 User Manual
Page 319

2. Position the tip of the pen point where you want the straight segment to begin, and click to define the first object anchor point. The object
anchor point remains selected (solid) until you add the next point.
Note: The first segment you draw is not visible until you click a second object anchor point. Also, if lines extend from either side of the
point, you’ve accidentally dragged Pen Tool; choose Edit > Undo and click again.
3. Click again where you want the segment to end. (Shift-click to constrain the segment’s angle to multiples of 45°.) Pen Tool creates another
object anchor point.
4. Continue clicking Pen Tool to create additional straight segments. The last object anchor point you add appears as a large square, indicating
that it is selected.
5. Complete the path by doing one of the following:
To close a path, click the initial object anchor point. A circle appears underneath the pen pointer when it is directly over the initial object
anchor point.
To leave the path open, Ctrl-click (Windows) or Command-click (Mac OS) anywhere away from all objects, or select a different tool in
the Tools panel.
Draw curves with Pen Tool
Draw curved segments by dragging the object anchor points with Pen Tool. When you use the Selection tool to select an object anchor point
connecting curved segments, the segments display direction lines, which end in direction points. The angle and length of the direction lines
determine the shape and size of the curved segments. Moving the direction lines reshapes the curves. A smooth point always has two direction
lines that move together as a single, straight unit. When you drag the direction point of either direction line on a smooth point, both direction lines
move simultaneously. Pen Tool maintains a continuous curve at that object anchor point. In comparison, a corner point can have two, one, or no
direction lines, depending on whether it joins two, one, or no curved segments, respectively.
Corner point direction lines maintain the corner by working independently of one another. When you drag a direction point on a corner point’s
direction line, the other direction line, if present, does not move. Direction lines are always tangent to (perpendicular to the radius of) the curve at
the object anchor points. The angle of each direction line determines the slope of the curve. The length of each direction line determines the
height, or depth, of the curve.
1. Select Pen Tool.
2. Position the cursor where you want the curve to begin. Hold down the mouse button.
3. Drag to create direction lines that determine the slope of the curve segment you’re creating. In general, extend the direction line about one
third of the distance to the next object anchor point you plan to draw. Shift-drag to constrain the direction line to multiples of 45 °.
4. Release the mouse button.
Note: The first segment is not visible until you create the second object anchor point.
5. Position Pen Tool where you want the curve segment to end.
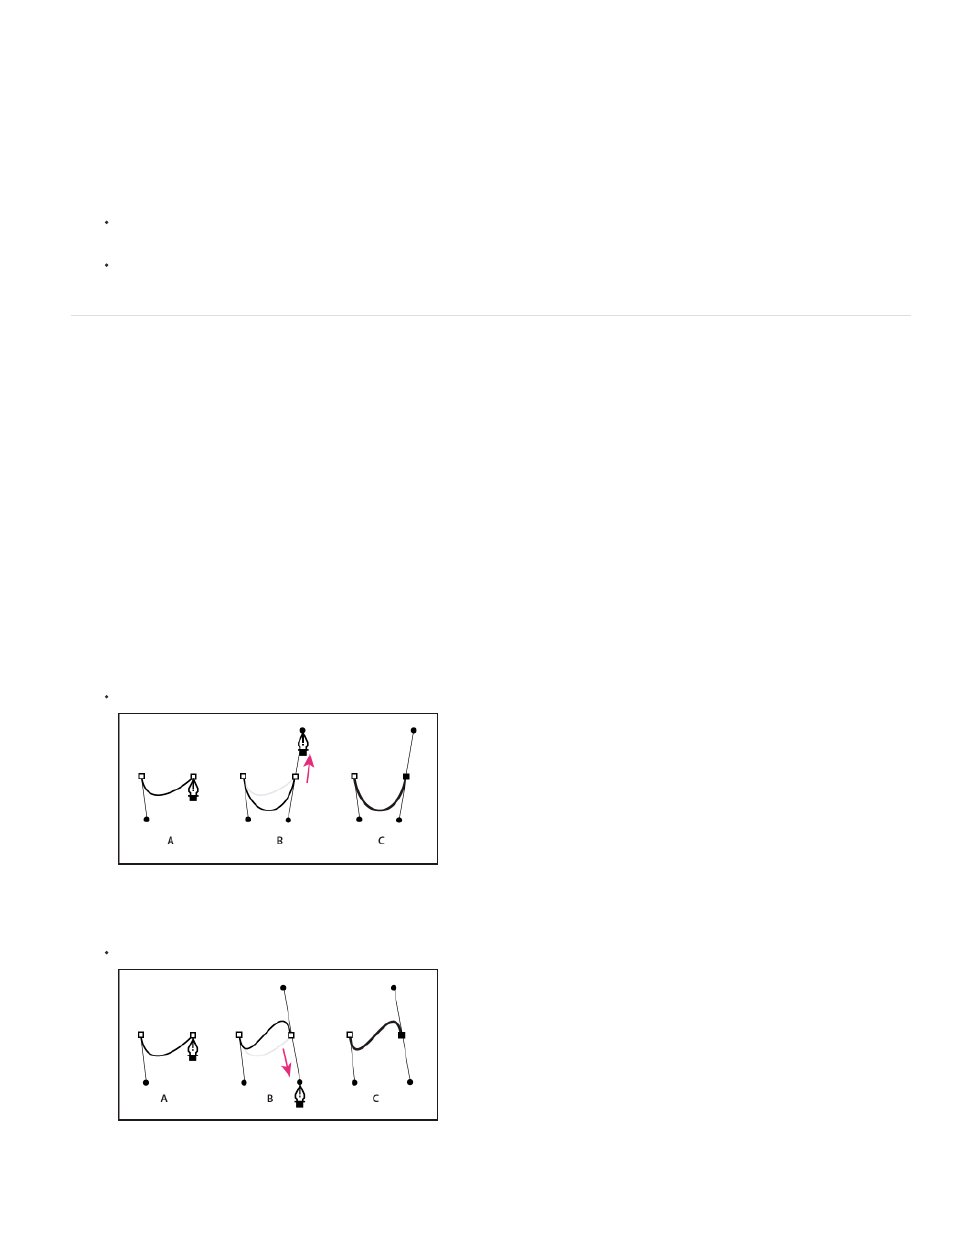
To create a C-shaped curve, drag in a direction opposite to the direction that you dragged to create the previous object anchor point.
Drawing second point in curves
A. Starting to drag second smooth point B. Dragging away from previous direction line, creating C-shaped curve C. Result after
releasing mouse button
To create an S-shaped curve, drag in the same direction that you dragged to create the previous object anchor point.
Drawing S curves
A. Starting to drag new smooth point B. Dragging in same direction as previous direction line, creating S-shaped curve C. Result after
releasing mouse button
315